
Focused: Electrical Calculations in Revit
- Structures Insider

- Jul 12, 2022
- 3 min read

My name is Ruslan, I am working as an Electrical Design Engineer. As usual, I am working with big residential and commercial buildings with a professional team. In my work, I use Revit for preparing plans, BOM, cable schedule, etc., and Excel for calculations and SLD.
Last year I decided to do a whole project, including calculations, in Revit, however without any external software and plugins to keep a model “clear”. So, I had many problems with this decision because Revit has a poor toolset to do calculations, especially for electrical loads.
But fortunately, this is not true, if you know to use Revit very well, because this program gives enormous possibilities to build what, we, the user wants by using a mix of different tools.
And I began experimenting...
In this article, I share my knowledge in solving the problems with doing calculations in Revit in the following chapters:
1. What we can do in Revit using “visible” tools;
2. What “invisible” tools we can use;
3. Conclusion.
1. WHAT WE CAN DO IN REVIT USING “VISIBLE” TOOLS
As a rule of thumb, working in Revit as a casual designer looks like this:
a. make some settings;
b. place electrical panels;
c. place consumers and connect them to the placed panels;
d. adjust circuit route and add rise/down length;
e. create or use template schedules of electrical circuits.
After these actions, you will receive the electrical circuit schedule list of the calculation parameters, but the wire size shown is not correct (not in EU form), also we cannot receive in this schedule demand factor and demand load, for this reason, we can use it only for consumers, for panels which consist of different types of loads, it does not work.
The demand factor and demand load we have in the electrical equipment schedule, however, cannot link electrical circuits and electrical equipment parameters to do necessary calculations without Dynamo, for example.
And the second problem, we cannot show these calculated parameters in a graphical view (single line diagram), because there is no existing link between electrical circuits and generic annotation. As result, many designers use Excel for calculations and AutoCAD for SLD.
2. WHAT “INVISIBLE” TOOLS WE CAN USE
The most powerful tool, we can use to do calculations is key schedules. To work with electrical calculations, I recommend basing it on the electrical circuit family, because here we have power, current, and length.
Key schedules allow us to add any necessary information to the project, which we can use in formulas in schedules and makes it possible to realize many methods of calculations. Furthermore, all information and formulas are in one program, and we can control the calculation process and final values.


What about demand loads.
To work with loads we need no key schedule. What we need is to create a custom "number" parameter in the schedule and multiply it by the total load (in VA). Value for the demand factor we receive from electrical equipment and manually or using Dynamo replace it in our custom parameter.
Beginning from Revit 2022 we have the possibility to add to the key schedule the shared parameters that make it work faster and easier and this feature unloads the model in general because we can keep fewer families and types of families.

3. CONCLUSION
With this wise approach and with many efforts in Revit we can solve any problem and by using Dynamo we can make faster some tasks/moments that Revit cannot accelerate.
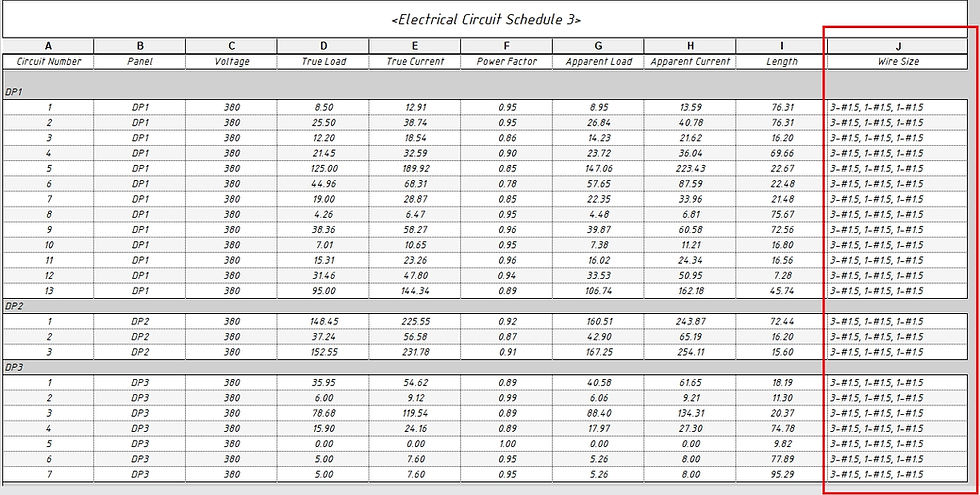
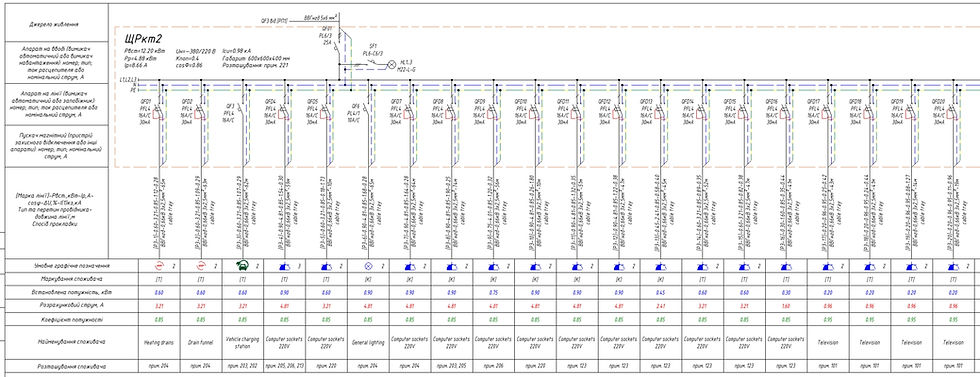
Here is an example of calculated parameters in an electrical circuit schedule:
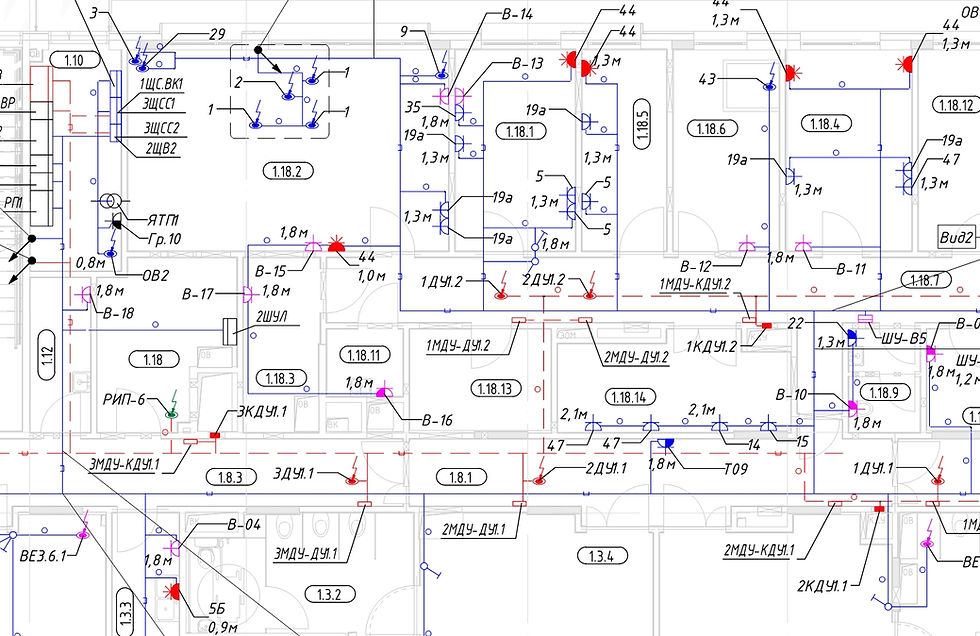
Here is an example of replaced calculated parameters to generic annotation families using Dynamo:
P.S. I am always open to collaboration if you have a big, interesting project and want to do it in Revit without external programs and addins, feel free to contact me by email: r.plechen@outlook.com


